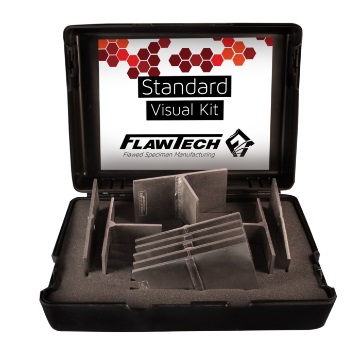
Standard Visual kit /specimen
Description
The Visual Kit Contains:
10 Specimens: 7 Plates and 3 Tees
20 Total Discontinuities
Each specimen contains 2 “REAL FLAWS” Randomly Placed
Specimens are packaged in a Free Carrying Case, complete with Document Package with “Flaw Truth” documented by CAD drawings with a Standard Tolerance of (+/-) 0.150″ (4mm).
- Material: Carbon Steel
- Kit Spec: 10 Specimens
- (7) Plates: 0.25”T x 4” x 8”
- (3) Tee: 0.25″T x 4” x 8” x 4”
- Flaws: 2 each specimen, for a total of 20
- Documentation Package Includes: Certificate of Conformance, CAD Drawings and Test Sheets
- 1 Carrying Case: 6” x 16” x 20” each
Flaws Included:
#20 – Crater Crack SV (surface stop-start area)
#32 – Porosity SV (surface breaking)
#33 – Porosity fillet (surface breaking)
#56 – Incomplete Root Penetration SV
#59 – Incomplete Groove Weld (crown area)
#70 – Root Concavity SV
#71 – Excess Root Penetration SV
#72 – Misalignment Root & Crown SV
#73 – Uneven Leg Length Fillet
#74 – Excess Crown SV
#75 – Excess Crown Fillet
#76 – Concave Crown SV
#77 – Concave Crown Fillet
#78 – Undercut SV
#79 – Undercut Fillet
#80 – Overlap Fillet
#90 – Weld Splatter SV
#91 – Weld Splatter on Filler
Shipping Weight 35 lbs.


